
High-intensity-discharge lights
Other artificial-light choices include high-intensity-discharge lights. These are very efficient in their production of light and are especially useful where you want to grow orchids requiring higher light intensities than fluorescent lamps can provide and/or where you want a greater working distance between the lights and plants.
The chart below give you some guideline about how large of an area different wattage lamps cover.

High-intensity-discharge lights do have the disadvantage of producing quite a bit of heat, so make sure not to get the plants too close to the bulbs.
The two most frequently used lamps for these systems are metal halide (MH) and high-pressure sodium (HPS). HPS is more energy-efficient than MH, but the light it emits is orange-yellow and distorts the color of the flowers and foliage. MH produces blue light that is more pleasing to the eye. Some manufacturers now produce lamps that combine the advantages of both.
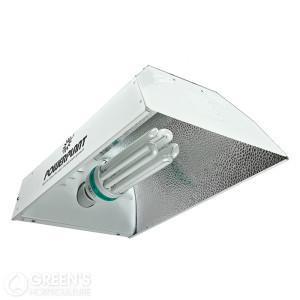
Another newer option is the high-intensity compact fluorescent lights. The fixtures for these look much like high-intensity-discharge (HID) units. They don't produce quite as much light as HID, but they have the advantage of producing little heat — so there is much less likelihood of orchids being burned.
Below is a compact fluorescent bulb mounted in a reflector.
If you're a beginner light gardener, I recommend starting with fluorescent-light setups. I find them to be most practical. Later, if you have the need, you can give the high-intensity-discharge lamps a try.
Humidity: Orchids Love It
Humidity is something you can't see, but you can feel it on a muggy summer day or in a steamy greenhouse. The vast majority of orchids are from the tropics, where high rainfall and humidity prevail. When orchids get enough humidity, they grow lushly and their leaves have a healthy shine.
Insufficient humidity can stunt an orchid's growth and, in severe cases, it can cause brown tips on leaves. It can also contribute to buds falling off (known as bud blast), leaves wrinkling, and drying of the sheaths (the tube-like structures that surround the developing flower buds), which can result in twisted or malformed flowers.
Blasted bud blast!
Nothing is more disheartening than having the buds of your orchids shrivel up right before they open! This is referred to as bud blast and is caused when the orchid undergoes different types of stress. Here are some of the specific causes of this exasperating event:
* Low humidity
* Hot air from furnaces or cool, dry air form air-conditioners directly blowing on the orchid plant
* Over- or underwatering
* Poor root development
* Temperatures that are too high or too low
* Water standing in the buds or bud sheaths
* Dramatic change in the orchids environment, like bringing the plants from outside to inside
* Natural-gas leaks in the house
* Ethylene gas from ripened fruit
* Light that's too bright on the developing flower buds
* Pollution, such as smog
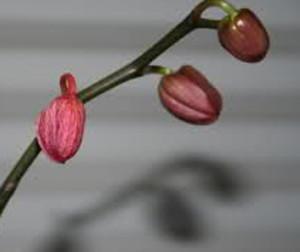
Below is an example of "bud blast" on phalaenopsis. Notice that the lowest, oldest bud is starting to shrivel. It will then fall off. The oldest buds are usually the first to be affected.
During the winter, homes, especially those in cold climates with forced-air heating systems, usually have a relative humidity of about 15 percent. Because this is the average humidity found in most desert areas, you have to do something to raise the humidity to around 50 percent — a level that will make orchids happy and won't do damage to your walls or furniture.
For greenhouses, this process is a relatively simple matter. You can either regularly hose down the walkways or hook up foggers and commercial humidifiers to a humidistat so that the entire operation is automatic.
Below is an example of a greenhouse humidistat.
If you're growing your orchids in your home, you'll need a different approach. High humidity levels that would be no problem in a greenhouse will peel the paint, plaster, and wallpaper off the walls of your house. Assuming that's not the look you're going for, you can take several steps to get to the desirable humidity range without causing damage to your house. If you can, put your orchids in a naturally damp area, like the basement.
Wherever you put your orchids, use a room humidifier. I find the best type of humidifier is an evaporative-pad humidifier (in which fans blow across a moisture-laden pad that sits in a reservoir of water). An evaporative-pad humidifier is usually better than a mist or ultrasonic humidifier, because, unlike a mist humidifier, it doesn't leave your orchids with a white film (from the minerals in the water being deposited on the leaves).
Below you can see an illustration showing how the the evaporative-type humidifiers work.

To further increase the humidity level, you can try growing the plants on top of a waterproof tray filled with pebbles. Add water to the tray so that the level is just below the surface of the pebbles, then put the plants on top of this bed of damp gravel. The problem that I find with this system is that the pots, especially the heavy clay ones, frequently sink into the pebbles, resulting in the media in the pots getting soggy and, after repeated waterings, the pebbles becoming clogged with algae and being a repository for insects and various disease organisms.
The approach that I think works much better is to add sections of egg-crate louvers (sold in home-supply stores for diffusing fluorescent lights) to the trays . You can cut this material with a hacksaw to whatever size you need. It's rigid so it will support the plants above the water, and the water is more exposed to air, so more humidity results. The grating is simple to clean — just remove and spray it with warm water. To prevent algae or disease buildup, you can add a disinfectant like Physan or 409 to the water in the trays.
You can also purchase humidity trays with water reservoirs that have grating that fits in the tray.

Misting is another way to increase humidity. This works okay, but in order for it to be effective you need to do it several times a day, because the water usually evaporates very quickly. A problem with misting is that, if your water source is mineral-laden, your orchid's leaves may become encrusted in white — not only is this unsightly, but it keeps light from penetrating to the leaves. A benefit to misting is that it can clean the dust from the leaves.
Fresh Air Circulation is Very Important
In most tropical lands where orchids reside, they luxuriate in incessant, but gentle, trade winds. Air movement in a growing environment ensures a more uniform air temperature and dramatically reduces disease problems by preventing the leaves from staying wet too long. It also evenly distributes the gas (carbon dioxide) that is produced by the plants in the dark and used by the plants to produce their food during the daylight hours.
You don't want to create gale-force winds in your growing area, but you do want to produce enough airflow to cause the leaves of the orchids to very lightly sway in the breeze. I've found that two of the most effective methods for provide such an airflow for both a hobby greenhouse and an indoor growing area are ceiling fans and oscillating fans.
Ceiling fans
Ceiling fans move a huge volume of air at a low velocity in a circular pattern, so they effectively prevent severe temperature differences, are inexpensive to operate (they use about the same electricity as a 100-watt bulb), are quiet, have variable speeds, and are easy to install. They stand up well to moist conditions, especially if you buy the outdoor types. Another nice feature is that you can adjust the air-circulation pattern on most of them so that they can either push warm air down (the recommended winter setting) or pull cool air up (usually the best summer setting).
Ceiling fans eliminate temperature stratification so that the room temperatures stay even throughout the growing area. See the illustration below.

Oscillating fans
Oscillating fans are also a good choice, because they effectively cover large areas with a constantly changing airflow pattern without excessively drying off the plants.
If you decide to go with oscillating fans, splurge for the better-grade ones. Fans that are very inexpensive have plastic gears that strip easily, so the oscillating feature won't last long.
Muffin fans

You may have small hot or cold spots in your greenhouse, windowsill, or light cart where just a touch of airflow is needed. This is where small muffin fans, frequently sold for cooling computers (available at electronics or computer-supply stores), are perfect for the job. They're efficient, quiet, and very inexpensive to operate. Make sure to get one that is wired for 120 voltage so you can plug it directly into your household receptacles.