By Cathy White
For me, getting away from it all is simply a matter of stepping out the back door and spending a little time by our water garden. Listening to the soft sounds of rippling water and watching the graceful moves of the fish as they weave in and around the plants is my favorite way to unwind after a busy day.
Besides providing a retreat, our pond attracts all kinds of birds, insects, toads and frogs. Our vegetable garden benefits from the feeding habits of these pest-eating creatures, and I have the pleasure of watching them.
Every gardener can have a backyard oasis. A water garden needn't be large. The size of your property and your budget will determine the scope of the project. Late spring is an ideal time to build a garden pond because the soil is still moist, so is easy to dig. And, as outside temperatures get warmer and more consistent, you can introduce fish and plants to their new home.
Here are step-by-step instructions of how my family installed our pond:
- Stake the size and shape of your pond on the ground with a garden hose. Make the pond 18 to 24 inches deep for fish and deep water plants, with a 6- to 12-inch-deep zone to hold submerged pots. Dig a 6 inch trench around the inside edge of your outline and remove stakes. Dig toward the center, removing the top 6 inches of soil and sod. Use a spade to outline the deep water zone, then dig downward and outward from the center of this zone until it's the proper size and depth.
- As you excavate, make sure the outer edge of the pond is level or the pond will appear lopsided. Using a line level, string and yardstick, take measurements at 1-foot intervals around the perimeter. Skipping this step on our sloping site would have left 6 inches of the liner visible at the front of our pond and water lapping over the back. To level our site, we had to add 6 inches of soil around the back edge of our pond.
- To support soil at the low end, we sandwiched it between a strip of heavy-duty vinyl edging and landscape timbers. We nailed wooden stakes to a 5-inch-wide piece of edging, then positioned it along the back rim of the pond and hammered the stakes into the soil. Using the line level and yardstick, we raised or lowered the top lip of the edging until it was level, then cut the timbers and placed them along the length of the edging, leaving a 12-inch-wide gap. We filled this gap with excavated soil.
- An overflow pipe will prevent your pond from overflowing during heavy rain. You'll need a 1-inch-diameter PVC pipe, assorted fittings, "O"-rings and PVC glue. Install the pipe so that the bottom lip sits just above normal water level. Direct the overflow to an existing drainage channel, a sump drain or an underground drainage pipe.
- Smooth the walls of the excavated area and remove any sharp rocks, roots or other debris that might puncture the plastic liner. To cushion the liner, cover the walls with a 1-inch layer of sand, an old piece of carpet or carpet pad or several layers of damp newspaper.
- Open the liner and let it warm in the sun 30 minutes prior to installing to make it more flexible. Center it over the top of the excavation and secure corners with bricks or stones. Slowly begin filling with water. Smooth out creases while the pond is filling. Folds are inevitable but will go unnoticed once the pond is edged and planted. Make sure you get a "fish grade" liner; a black one will make the pond look deeper and more natural.
- Allow the pond to settle for a few days, then trim off any excess liner, leaving a 12-inch flap. Bury the liner in a sloping trench, backfill with topsoil and then plant flowers or grass, or top it with gravel, river rock or boulders. Set all stonework in a 2- to 3-inch bed of sand or cement that is sloped to carry off rainwater. If the pond is contaminated with cement, soil or other debris, siphon the water out, clean the pond and refill with fresh water.
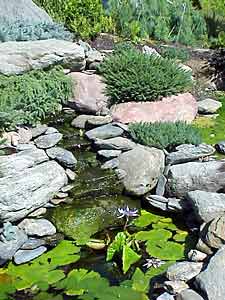
- After filling, allow the water to warm for a few days. City tap water is often treated -- chlorine will dissipate naturally after a few days but chloramine must be removed with a dechlorinator. You should also adjust the pH if necessary. Add plants first, then wait at least two weeks before adding fish. The main plants we used are floating heart, tall, leafy pickerel rush and water lilies.
Photography by Suzanne DeJohn & National Gardening Association