

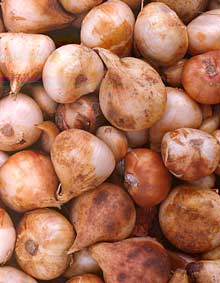
Summer-flowering bulbs require the same basic planting and care as given for spring-flowering bulbs, only they are planted in spring instead of fall. Summer-flowering bulb favorites include achimenes, begonia, caladium, calla lily, canna, dahlia, gladiolus, lily, and lily-of-the-Nile (Agapanthus).
Photography by National Gardening Association
Summer Bulbs
In any gardener's inventory of beauty, the group of plants known collectively as "summer-flowering bulbs" may be the least known and under-utilized of them all. Every gardener has at least a passing awareness of spring-flowering bulbs, but ask even an accomplished gardener to list more than three summer-flowering bulbs, and you'll probably hear a lot of stammering and stuttering. Too bad.
Comprised mainly of exotic species from foreign lands, summer-flowering bulbs can lend impressive amounts of color and beauty to the summer and late-summer landscape, for very little effort or expense. And, if you choose them right, many have the added benefit of becoming permanent residents in your garden -- not only returning every summer, but actually multiplying in the process (in regions with cold winters, most gardeners dig the bulbs in fall and store them over the winter in a cool, well-ventilated location).
In addition to their charm and beauty, the large and diverse group of plants known as bulbs have a lot going for them: They come in neat little packages, are just about 100 percent guaranteed to bloom the first year they are planted, and are surprisingly pest- and disease-free. The biggest challenge for home gardeners seems to be in remembering to plant them in fall so they'll bloom the following spring--or in the case of summer-flowering bulbs, remembering to plant them in early spring. Some of the best known and loved spring-flowering bulbs include anemone, crocus, freesia, frittilaria, grape hyacinth, hyacinth, iris, lily, lily of the valley, narcissus (which include daffodils), ornamental onion (Allium) ranunculus, and tulips.
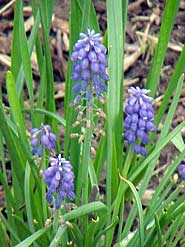
Spring-flowering Bulbs
Planting and enjoying the beauty of bulbs is one of the most straightforward propositions in all of gardendom. Following the tips below should practically guarantee success, even if you're a first-time bulb planter.
Sometime in autumn, spring-flowering bulbs will arrive at your local nurseries and garden centers by the bushel-load. About the same time, you'll probably also begin receiving beautiful catalogs offering you spring-flowering bulbs through the mail. Whether you buy them from a local source or order them from a catalog, buy them early for the best selection and always order or buy from a reputable source that offers top-quality bulbs.
Once you have your bulbs in hand, it's a good idea to plant them as soon as possible. If you have to delay planting, store the bulbs in paper bags (not plastic) in a well-ventilated, cool spot.
In the main, all bulbs prefer a sunny location in the garden as well as well-drained soil. If your soil is heavy (or exceptionally sandy), add two or three inches of organic soil amendment (such as compost, ground bark, or peat moss) and cultivate the soil to a depth of six inches or more, incorporating the organic amendment as you turn the soil.
When it comes to accenting gardens with bulbs, more is always more. Don't skimp! And for some unknown reason, many gardeners become regimented when they plant bulbs, arranging them in precise lines and grids. If you don't want your garden to look like a display in a municipal garden, gently throw the bulbs on the ground and plant them where they lie. Random clumps and drifts suit bulbs well, resulting in a natural-looking garden.
As far as planting depth is concerned, here are the general rules: Plant large bulbs at a depth about twice the height of the bulb; plant small bulbs slightly deeper than twice their height. In regions with extremely cold winters, err on the side of planting deeper than normal.
After planting, lightly apply a complete, dry fertilizer over the bed. Use a fertilizer low in nitrogen, such as a 9-6-6 formulation. No further fertilizer will be necessary until the shoots appear from the soil in spring, when one additional application of the same complete fertilizer will see the bulbs through the growing season.
Once the bulbs are planted and fertilized, water the bed thoroughly to settle the soil. If desired, cover the bed with a 1-inch layer of organic mulch to deter future weeds and improve the soil.
If gophers, mice, squirrels, or chipmunks are prevalent in your area, you might want to protect your bulb investment by planting them in a "cage" fashioned with chicken wire.
In spring, after the bulbs have finished blooming, remove only the spent flowers. Allow the foliage to grow for as long as it cares to. Once it has turned completely yellow or brown, simply yank it from the below-ground bulb. Removing the foliage while it is still green will seriously diminish the bulb's vigor the following year. If necessary, disguise the withering bulb foliage with an overplanting of spring annuals, such as violas, calendulas, or pansies.