
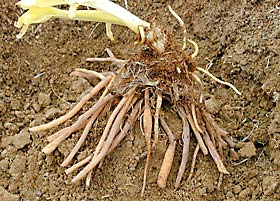
If you have just purchased your first bare-root perennial, you may be surprised to receive what appears to be a jumble of roots and very little green growth. Don't worry! Most bare-root perennials are shipped in a dormant or semi-dormant state, and will burst forth with life once planted.
Why Bare-Root?
Bare-root perennials have a number of advantages over plants sold in containers. They are often less expensive, since they take up less space and are easier to ship. You may find a greater selection of varieties available, since nurseries can maintain large inventories. Finally, bare-root plants often establish themselves more quickly than container-grown plants -- their roots are often sturdier and aren't pot-bound, and the plants aren't "spoiled" by overly rich potting soil.
Inspecting Plants
As soon as you receive your plants, open the carton and inspect them. What should you look for? The roots and packing material -- usually wood shavings, shredded paper, or sphagnum moss -- should be moist but not soaking wet. A bit of mold on the roots and packing material is OK.
Storing Bare-Root Plants
It's best to plant bare-root perennials immediately. If possible, prepare the planting area ahead of time so you can plant them as soon as they arrive. If you cannot plant right away, you can store plants in a cool (35-50° F), dark place for a day or two. Do not let plants freeze. Keep the plants inside their plastic bag, and make sure packing material remains moist. If you must store them longer than that, heel them into a temporary bed: Dig a trench, remove the plants from their packing material, lay the plants on their sides with the roots in the trench, cover the roots with loose soil, and water well.
 Planting
1. Remove plants from their packing material and prune off any damaged or extra long roots. Soak the roots in a pail of warm water set in the shade while you prepare the bed.
2. Most perennials prefer full sun and well-drained soil. If you are creating a new bed, till the area to a depth of about 10 inches, add a few inches of compost, and till again. If you are planting in an established bed, work compost into the top 6 to 8 inches of soil.
3. Inspect the plant to determine the depth of the planting hole you'll need. The plant should sit at the same height it did at the nursery. If the plant has top growth, you'll be able to see the original soil line. If there is no top growth, you'll want to set the plant so the crown -- the top of the roots where the stems will emerge -- sits at or just below the soil line. The width of the planting hole should one and one half times the root spread.
4. Build a cone of soil in the bottom of the planting hole. Do not add fertilizer to the planting hole.
5. Place the plant in the hole, spreading the roots around the surface of the cone. Gently backfill the hole, firming the soil as you go. Don't step on the soil -- just press it down with your hands. Leave a slight depression around the plant to hold water. Water the plant, saturating the soil around the plant.
6. Once the plant is established, lay a 2- to 3-inch thick layer of mulch around plants to conserve moisture and deter weeds. Be sure to leave a few inches bare around the base of the plant.
Care
Keep plants watered during their first season. A weekly deep soaking will encourage an extensive root system; avoid frequent light sprinklings. Apply a layer of compost each spring to provide nutrients and maintain soil health. Beyond that, most perennials need little supplemental fertilizer.